安装深度学习的环境还是很复杂的,特别是 linux 下安装,新手更是闹不明白,笔者在安装的过程中因为执行错了命令,导致系统重做,各种血泪,本文是在重新安装的系统上实践出来的结果,仅供参考
安装nvidia驱动
安装驱动
1
sudo apt install nvidia-smi nvidia-driver
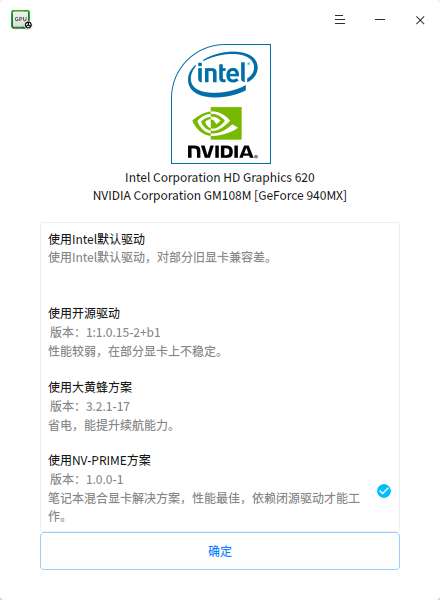
调整显卡管理方案
使用系统自带的
显卡驱动管理器将显卡方案设置为NV-PRIME。
重新启动系统,应该能够看到旋转的茶壶画面
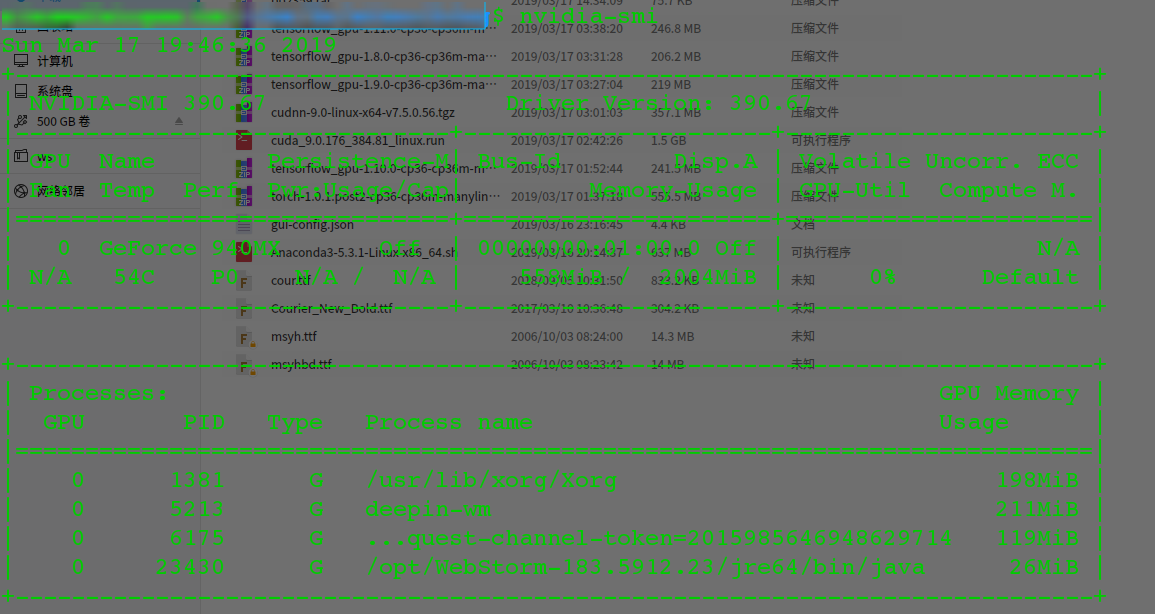
验证安装成功与否,打开终端输入命令
nvidia-smi,如果出现类似下图,就说明安装成功了。
安装cuda
驱动安装完成后,就可以安装 cuda 了,不过在此之前还需要检查下gcc和g++的版本是否在 4.9~6.0之间,deepin自带的是7.+,需要降级。1
2
3
4
5sudo apt install g++-6 gcc-6
cd /usr/bin
sudo rm gcc g++
sudo ln -s g++-6 g++
sudo ln -s gcc-6 gcc
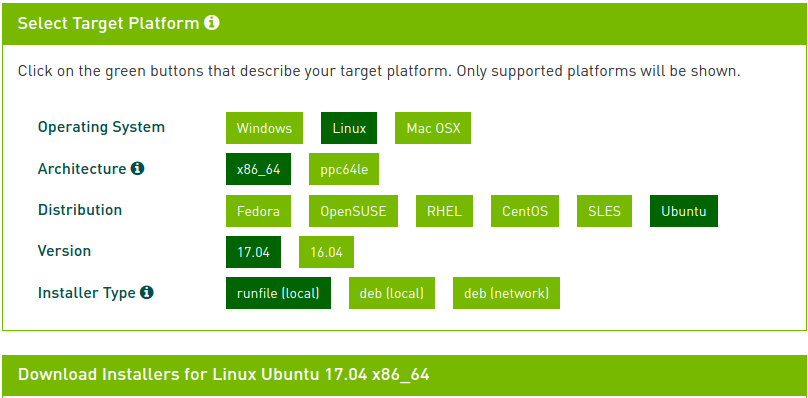
可以正式开始安装,cuda建议使用官方的安装的包,不要使用默认安装源内的版本,容易出现不兼容的问题。
下载 cuda 9.0,这里选择了如下图。
使用
sudo sh cuda_9.0.176_384.81_linux.run安装,安装过程中跳过 nvidia 驱动的安装,因为在上面我们已经安装过了,其他的依次正常安装即可。将cuda添加到环境变量,在~/.bashrc文件中末尾加上
1 | # cuda |
1 | source ~/.bashrc |
查看版本
1
2
3
4
5$ nvcc --version
nvcc: NVIDIA (R) Cuda compiler driver
Copyright (c) 2005-2017 NVIDIA Corporation
Built on Fri_Sep__1_21:08:03_CDT_2017
Cuda compilation tools, release 9.0, V9.0.176运行 cuda samples 测试
- 进入要运行的测试程序,
cd ~/NVIDIA_CUDA-9.0_Samples/1_Utilities/deviceQuery 编译
make1
2
3"/usr/local/cuda-9.0"/bin/nvcc -ccbin g++ -m64 -gencode arch=compute_30,code=sm_30 -gencode arch=compute_35,code=sm_35 -gencode arch=compute_37,code=sm_37 -gencode arch=compute_50,code=sm_50 -gencode arch=compute_52,code=sm_52 -gencode arch=compute_60,code=sm_60 -gencode arch=compute_70,code=sm_70 -gencode arch=compute_70,code=compute_70 -o deviceQuery deviceQuery.o
mkdir -p ../../bin/x86_64/linux/release
cp deviceQuery ../../bin/x86_64/linux/release运行编译结果
./deviceQuery1
2
3
4
5
6
7
8
9
10
11
12
13
14
15
16
17
18
19
20
21
22
23
24
25
26
27
28
29
30
31
32
33
34
35
36
37
38
39
40
41
42
43./deviceQuery Starting...
CUDA Device Query (Runtime API) version (CUDART static linking)
Detected 1 CUDA Capable device(s)
Device 0: "GeForce 940MX"
CUDA Driver Version / Runtime Version 9.1 / 9.0
CUDA Capability Major/Minor version number: 5.0
Total amount of global memory: 2004 MBytes (2101870592 bytes)
( 3) Multiprocessors, (128) CUDA Cores/MP: 384 CUDA Cores
GPU Max Clock rate: 1189 MHz (1.19 GHz)
Memory Clock rate: 2505 Mhz
Memory Bus Width: 64-bit
L2 Cache Size: 1048576 bytes
Maximum Texture Dimension Size (x,y,z) 1D=(65536), 2D=(65536, 65536), 3D=(4096, 4096, 4096)
Maximum Layered 1D Texture Size, (num) layers 1D=(16384), 2048 layers
Maximum Layered 2D Texture Size, (num) layers 2D=(16384, 16384), 2048 layers
Total amount of constant memory: 65536 bytes
Total amount of shared memory per block: 49152 bytes
Total number of registers available per block: 65536
Warp size: 32
Maximum number of threads per multiprocessor: 2048
Maximum number of threads per block: 1024
Max dimension size of a thread block (x,y,z): (1024, 1024, 64)
Max dimension size of a grid size (x,y,z): (2147483647, 65535, 65535)
Maximum memory pitch: 2147483647 bytes
Texture alignment: 512 bytes
Concurrent copy and kernel execution: Yes with 1 copy engine(s)
Run time limit on kernels: Yes
Integrated GPU sharing Host Memory: No
Support host page-locked memory mapping: Yes
Alignment requirement for Surfaces: Yes
Device has ECC support: Disabled
Device supports Unified Addressing (UVA): Yes
Supports Cooperative Kernel Launch: No
Supports MultiDevice Co-op Kernel Launch: No
Device PCI Domain ID / Bus ID / location ID: 0 / 1 / 0
Compute Mode:
< Default (multiple host threads can use ::cudaSetDevice() with device simultaneously) >
deviceQuery, CUDA Driver = CUDART, CUDA Driver Version = 9.1, CUDA Runtime Version = 9.0, NumDevs = 1
Result = PASS
- 进入要运行的测试程序,
这样 cuda 的安装就大功告成了。
cudnn 的安装
打开cudnn 下载地址 下载 cuda-9.0 对应版本的 cudnn,需要注意的是 cudnn 需要注册登录才能下载。
这里下载的是 cuDNN 7.5 for CUDA 9.0 对应的linux版。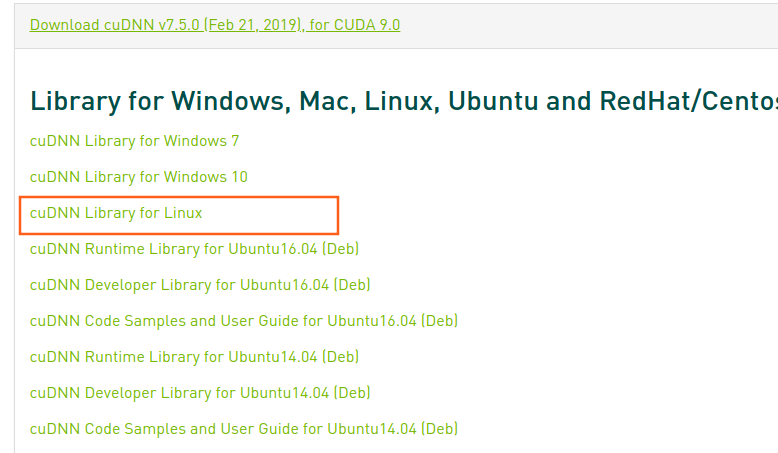
下载完成后 tar -zxvf cudnn-9.1-linux-x64-v7.1.tgz , 将解压出来的cuda文件夹复制到/usr/local。
关键的步骤来了1
2
3$ cd /etc/ld.so.conf.d
$ touch cuda.conf
$ vi cuda.conf
在conda.conf中输入如下内容1
2/usr/local/cuda/lib64
/usr/local/cuda-9.0/lib64
之所以说是关键步骤,因为经过无数次的测试验证,这样的配置可以解决 tensorflow 运行时出现的ImportError:libcublas.so.9.0: cannot open shared object file: No such file or directory 和 ImportError:libcudnn.so.7: cannot open shared object file: No such file or directory
结束
不断学习思考是不断进步的保证